Learn Recipe: WebSocket using Java
In this first article on websocket we will learn what is websocket and its implementation in JAVA EE6.
In part2 we will see new Java websocket API JSR356
So lets KICKSTART Websockets.
Precook : Few tech facts
What is Websocket ? A brief introduction
- New protocol introduced in HTML5 specification (RFC 6455)
- Leverages HTTP upgrade technology
- Upgrade HTTP to Websocket
- Once connection established no headers, cookies required
- A full duplex communication
- Independent message can be sent in both direction (server-client).
- Supports binary data
- Since uses TCP/HTTP, thus work on same port
- Also support secure connection ie both ws:// or wss:// supported.
- Intended to use for: Chat Applications,Interactive games,Media Streaming, Notifications,server push…
- Browser Support : (All leading browser supports)Firefox,Chrome,Safari,IE10,etc…
- Server support: Apcahe Tomcat 7,Oracle Glassfish3,Oracle Glassfish4
- JAVA API:
- For JAVA EE 6: Third party API available.( Tomcat7 /Glassfish3 /Jwebsocket / Lightstramer )
- For JAVA EE7: Implemented (JSR356) Java API for Web Socket.
Let’s Cook : Simple Eco application
In this example we can check how to create web-socket connection using java script and server side controller code.
- Ingredients:
- IDE : Netbeans 7.3
- Java Platform : JDK 1.6 , Java EE 6
- Application Server : Tomcat 7.0.45
- Websocket API : Tomcat Websocket API
- Browsers : FF22.0, Chrome 27
- Step 1: Client Side Coding
- Create new web application project as “WebSocketApp”
- Create JSP/HTML page to send messages to server and receive
- We create simple UI as bellow
 <div>
      <div style="overflow-y: scroll; width:250px; height: 300px;" id="screen"></div>
      <input type="text" placeholder="Enter Message" id="msg"/>
      <button id="send" onclick="send();">Send</button>
 </div>
- Here comes important part of java script manages connection and events.
<script type="text/javascript">
                var websocket;
                var uri = 'ws://' + window.location.host + '/WebSocketApp/websocket/simpleEchoMessage';
                function connect()
                {
                    if ('WebSocket' in window) {
                        websocket = new WebSocket(uri);
                    } else if ('MozWebSocket' in window) {
                        websocket = new MozWebSocket(uri);
                    } else {
                        alert('WebSocket is not supported by this browser.');
                        return;
                    }
                    websocket.onopen = function() {
                        display('Connected to server.');
                    };

                    websocket.onclose = function() {
                        display('Disconnected from server');
                    };

                    websocket.onmessage = function(event) {
                        display('server says :'+event.data);
                    };
                }
                function send()
                {
                    var msg = document.getElementById('msg').value;
                    display('Browser Says :'+msg);
                    websocket.send(msg);
                }
                function display(msg) {
                    var screen = document.getElementById('screen');
                    var p = document.createElement('p');
                    p.style.wordWrap = 'break-word';
                    p.appendChild(document.createTextNode(msg));
                    screen.appendChild(p);
                }
                connect();
        </script>
We initialize websocket object as
websocket = new MozWebSocket('ws://' + window.location.host + '/WebSocketApp/websocket/simpleEchoMessage');
Or for secure socket layer
websocket = new MozWebSocket('wss://' + window.location.host + '/WebSocketApp/websocket/simpleEchoMessage');
Please note we always have to use absolute path
There JS functions handles events like open close and on message received from server.
websocket.send(msg);
This sends message to server.
So we done with client side coding.
- Step 2: Server Side Coding
- Use Apache Tomcat 7.0.49 build or higher that includes websocket API. I am specific to Tomcat version because I face some issue while creating app with earlier version. More precisely earlier createWebSocketInbound(…) method does not have request object parameter in its signature. Now it has been added.
- Create class SimpleEchoServlet.java.
- Extends it with org.apache.catalina.websocket.WebSocketServlet class. WebsocketSevlet is wrapper written on HTTPServelet class for websocket.
- Override abstract method createWebSocketInbound(…)
- Create static final inner class of type MessageInbound
- We have to override abstract methods
- onBinaryMessage(…) for binary data
- onTextMessage(…) for string type data
- There are other methods can be overide as needed such as:
- OnOpen(…) handles open socket event by client
- onClose(…) handles socket close event by client
- onPong(…)
- onTextMessage(..) as we are sending text message from browser
- Here is code snippet
package org.playjava.websocket; import java.io.IOException; import java.nio.ByteBuffer; import java.nio.CharBuffer; import javax.servlet.http.HttpServletRequest; import org.apache.catalina.websocket.MessageInbound; import org.apache.catalina.websocket.StreamInbound; import org.apache.catalina.websocket.WebSocketServlet; /** * Created for playjava.wordpress.com * @author abhishek.anne */ public class SimpleEchoServlet extends WebSocketServlet { @Override protected StreamInbound createWebSocketInbound(String string, HttpServletRequest hsr) { return new SimpleEchoInbound(); } private static final class SimpleEchoInbound extends MessageInbound { public SimpleEchoInbound() { super(); } @Override protected void onBinaryMessage(ByteBuffer message) throws IOException { getWsOutbound().writeBinaryMessage(message); } @Override protected void onTextMessage(CharBuffer message) throws IOException { getWsOutbound().writeTextMessage(message); } } }- Now we done with controller part.
- Step 3: Request Controller Mapping
- We have to map request path with controller we just created inside web.xml file:
    <servlet>
        <servlet-name>wsSimpleEcho</servlet-name>
        <servlet-class>org.playjava.websocket.SimpleEchoServlet</servlet-class>
    </servlet>
    <servlet-mapping>
        <servlet-name>wsSimpleEcho</servlet-name>
        <url-pattern>/websocket/simpleEchoMessage</url-pattern>
    </servlet-mapping>
And we are done with cooking ! You can taste 😉 it.
In part II we will take look at JAVA EE 7 JSR356 Websocket API.
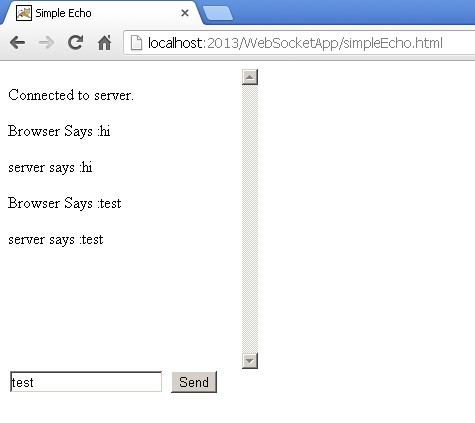
Hear is sample output screen. You can decorate your HTML as want.


Hi this is really helpful for me …………….. Thanks..
Hi…really helpful tutorial for me.
I have some questions that Can i transfer continuous data from server to client using websocket and can I transfer data in json format from server to client. ?
Thank You!
Yes you can transfer continuous data from server. It also supports JSON rather JSON is recommended.
How can I configure or change server side code to make it wss?
not clear what you are looking for. Could you specify your requirement.
Very helpful 🙂 Thanks a lot was struggling for week’s. I helped me a lot
Glad to know it helps you!
Hey Abhishek i need to recursively send messages from the server to client, how do i implement this in the code above??
try to put writeTextMessage() in loop
Hey I know its not right, but can u give a sample code where will i implement the above.
great….thanks man
I see an error. it is “The hierarchy of SimpleEchoInbound is inconsitent” . Please help me. Thank you!
Hi Abhishek, I have setup the scenario as mentioned by you but it shows message “Disconnected from server” when I runs HTML/JSP file!
Get code from here https://github.com/abhishekanne/WebsocketApps
I have created a web project with as suggested SimpleEchoServlet.java, simpleEcho.html and web.xml (with ref to https://github.com/abhishekanne/WebsocketApps ). Is this sufficient?